Why Your Front Door Camera Misses What’s Happening Right Next To It
Have you ever pulled up your doorbell footage after hearing a noise outside, only to find nothing there?
That happened to me twice in one month. My dog kept barking at something near the side of the house, and both times my camera showed… nothing. Just an empty porch and a quiet street. I started wondering if I was losing my mind, or if my camera was just useless.
Turns out neither was true. My camera simply couldn’t see past its own frame. The noise was coming from the side yard, a spot my lens never covered in the first place. I had spent months trusting a device that was only watching about a third of my property.
Once I figured that out, I felt a little embarrassed. I had installed the thing myself and never once questioned whether it actually covered everything I assumed it did.
If any of this sounds familiar, you’re not alone, and you’re definitely not imagining things.
Q: Why does this matter so much? A: Because a blind spot isn’t just a technical gap. It’s a false sense of security. You think you’re covered, so you relax. Then something happens right outside that invisible zone, and suddenly the camera you paid for feels like it did nothing.
Here’s what that gap tends to cost people in real life:
- Missed footage of someone testing your side door or gate
- No usable evidence when filing a police report or insurance claim
- A nagging feeling every time you leave the house, wondering what the camera actually sees
- Wasted money on a subscription plan for a camera that only covers half your entry points
None of that feels good. And it’s made worse by the fact that most doorbell camera boxes never mention coverage limits anywhere on the packaging. You find out the hard way, usually right when you need the footage most.
The fix isn’t complicated, though. Most blind spots come down to a short list of fixable causes, and you can knock most of them out in a single afternoon.
Closing the Gaps: A Practical Walkthrough for Full Coverage
Before changing anything, you need a clear picture of what your camera actually sees right now. Skipping this step is the most common mistake homeowners make.
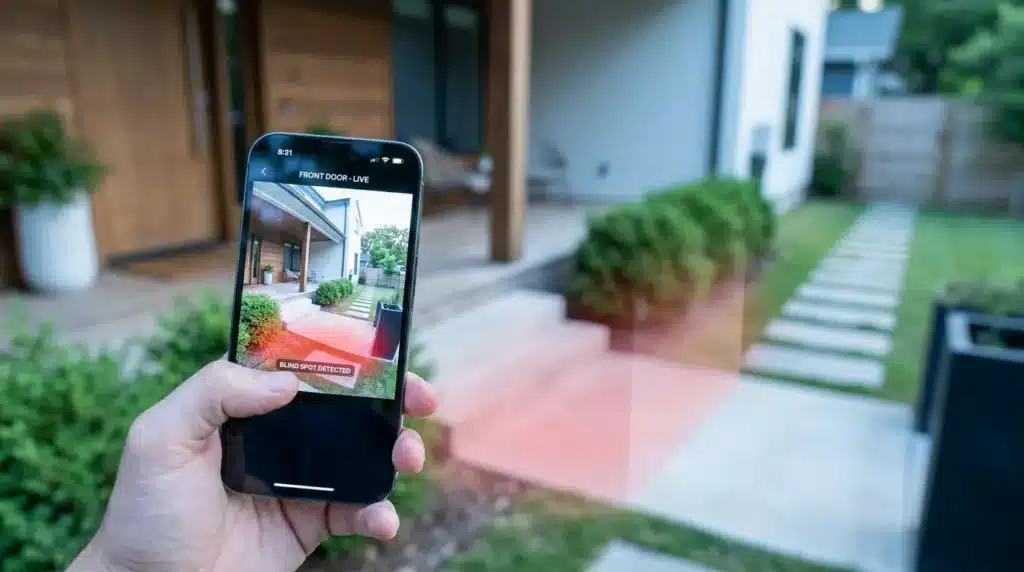
Walk Your Property With the App Open
Open your camera app and walk slowly around your porch, driveway, and side entry points while watching the live feed. Notice exactly where you vanish from the frame.
Mark those exact spots. This fifteen-minute walk will teach you more about your camera’s real coverage than any spec sheet ever could.
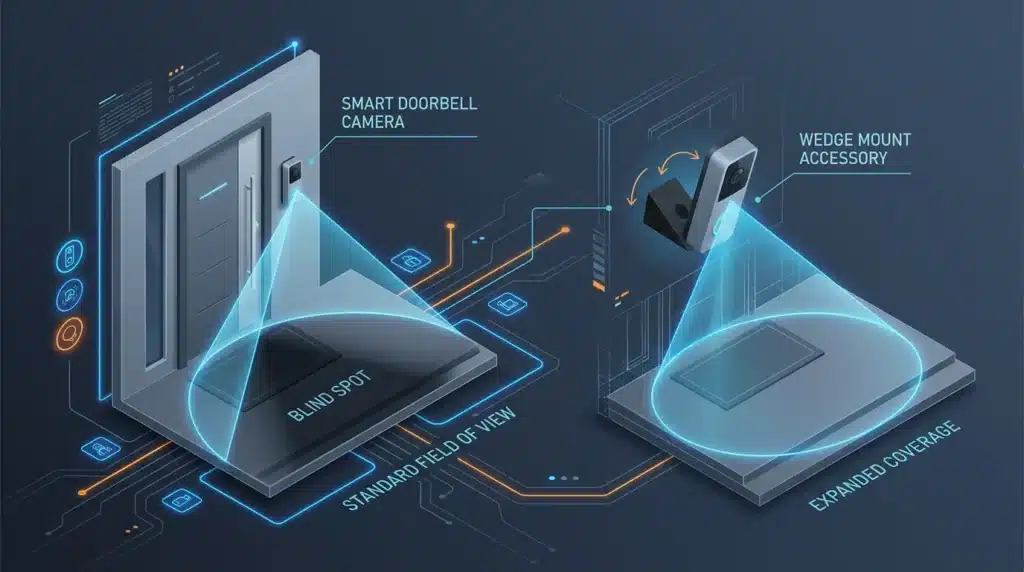
Most standard doorbell cameras only capture somewhere between 150 and 180 degrees. That leaves a lot of space uncovered, especially directly below the unit and along the sides of your house.
Re-Angle the Camera Before You Buy Anything
A huge number of blind spots exist simply because the camera was mounted straight out of the box, facing dead-ahead, with zero adjustment.
Try tilting the unit slightly downward and rotating it a few degrees toward whichever side gets more activity, like a driveway or side gate. Small shifts often make a big difference.
If your model supports an angled wedge mount, this is usually the cheapest and fastest fix available. According to installation research published by This Old House, correct camera height and angle account for a large share of usable footage quality in residential setups, often more than the camera’s resolution itself.
Something I learned the hard way: I assumed my camera’s angle was fixed forever, since it came pre-mounted from the manufacturer. It wasn’t. A five-dollar wedge mount fixed the exact blind spot that hid my side yard for months. I wish I had checked this on day one.
Don’t Expect One Camera to Cover Everything
This might be the most important mindset shift in this whole guide: one doorbell camera was never designed to watch your entire property.
It’s built to watch your front door. That’s it. Anything beyond that is a bonus, not a guarantee.
Good spots for an additional, lower-cost camera include:
- Facing the driveway if your doorbell only sees the front steps
- Covering a side gate or fence line leading to the backyard
- Mounted above a garage or secondary entrance
If you live in a rental and can’t drill into siding or brick, there are still solid ways to add coverage in an apartment without damaging anything, which is worth a look before you assume you’re stuck with just one angle.
Here’s a simple way to compare your two most realistic options:
| Fix Option | Approximate Cost | Setup Time | Best Use Case |
|---|---|---|---|
| Wedge mount angle adjustment | Low | Under 15 minutes | Fixing a poorly angled existing camera |
| Second, budget camera | Medium | 30-45 minutes | Covering a driveway, gate, or side yard separately |
| Wide-view replacement lens kit | Medium to High | Varies | Homes with large, open front porches |
| Custom motion zone setup in-app | Free | 5-10 minutes | Reducing missed alerts near known gaps |
Deal With Glare and Night Blind Spots Separately
Daytime coverage and nighttime coverage are honestly two different problems. A camera that looks great at 2 PM can turn into a blurry mess at 10 PM if your porch light is working against it.
Street lamps, porch fixtures, and even shiny house numbers can bounce light straight back into the lens, washing out everything nearby. If your night footage looks foggy or blown out, that’s usually glare, not a distance problem.
See how small lighting changes completely transform night visibility in this quick walkthrough.
Try switching off any light that shines directly toward the camera lens, and instead use a side-facing fixture that lights the walkway without pointing into the glass. This one change alone solves a huge share of “my camera sees nothing at night” complaints.
Use the App Settings You’ve Probably Never Opened
Past the initial setup screen, most people never touch their camera app again. That’s a mistake, because a lot of blind spot frustration gets solved for free right there.
Look for a motion zone or activity zone feature inside the settings. Setting this up forces you to actually study your camera’s real field of view, which usually reveals gaps you didn’t know existed.
Quick checklist before you spend money on new hardware:
- Walked the full property line while watching the live app feed
- Adjusted the camera angle or added a wedge mount
- Checked whether a porch light is creating glare at night
- Reviewed and customized motion zone settings in the app
- Decided whether a second, cheaper camera solves the gap better than replacing your main unit
When the Real Fix Is Your Layout, Not Your Camera
Sometimes the honest answer is that one camera was never going to cut it. If you have a wraparound porch, a side gate, or an attached garage with its own door, you’re dealing with multiple entry points that need their own eyes.
This is a good moment to think about how your doorbell camera fits into the rest of your setup, including whether your other smart home cameras are actually working together, and whether your front door itself could use reinforcing so a blind spot doesn’t turn into something worse.
Package and porch theft remains a widespread issue across the US, and consumer research from groups like the Better Business Bureau has repeatedly pointed to poor camera placement as one of the biggest reasons footage ends up useless after an incident.
If tight coverage around your mailbox is also a concern, it’s worth reading up on protecting your mailbox from identity theft, since that blind spot often gets overlooked entirely.
A Fast Note on Privacy Before You Reposition Anything
Every time you adjust an angle or add a new camera, take a second look at what it now captures, especially if a neighbor’s porch, window, or shared walkway falls into frame. The Federal Communications Commission has published general consumer guidance on smart home devices that touches on this exact issue, reminding homeowners that broader coverage comes with a responsibility to respect nearby properties.
At the end of the day, fixing a blind spot rarely means buying something new. Most of the time, it’s a matter of height, angle, and actually walking your own property with fresh eyes instead of trusting the box it came in.
Once your entry points are properly covered, it’s worth running through your other nighttime security habits too, since blind spots after dark tend to overlap with a handful of other easy-to-fix risks around a house.
Making Your Coverage Fixes Last More Than a Week
Fixing a blind spot once is easy. Keeping it fixed is where most people slip up.
I’ve noticed something interesting after helping a few neighbors sort out their own camera setups. The fix usually isn’t the hard part. The hard part is remembering to check on it.
Here’s the thing nobody tells you: cameras drift. Wind, temperature changes, and even someone leaning on a railing can shift your angle by a few degrees over time. You won’t notice right away. You’ll only find out the next time you actually need footage that isn’t there.
Build a Simple Monthly Check Into Your Routine
You don’t need a calendar reminder or a fancy app for this. Just tie it to something you already do.
Maybe it’s the first Sunday of the month when you take out the trash. Maybe it’s whenever you change your smoke detector batteries. Pick something consistent, and use it as your cue to open the app and glance at the live feed for thirty seconds.
This one small habit catches drift before it becomes a real problem. I do mine every time I water the plants near my porch, since I’m already standing right there anyway.
Watch for Seasonal Blind Spots You Didn’t Expect
This one surprised me the first time it happened. My camera worked perfectly all summer, then started missing half my porch once fall arrived.
The reason was simple once I figured it out. A tree near my walkway had grown thicker leaves in spring and summer, and by the time they thinned out in autumn, sunlight hit the lens at a completely different angle during certain hours.
Trees, bushes, and even seasonal decorations can quietly create new blind spots without you touching the camera at all. If your coverage seems to change with the seasons, check for:
- New plant growth blocking part of the frame
- Holiday lights or decorations sitting directly in the camera’s path
- Snow buildup on the lens or housing during winter months
- Longer or shorter shadows depending on the sun’s position through the year
Think About Height, Not Just Angle
Most people fixate on angle and completely forget about height. Yet height changes what a camera can actually resolve in detail, not just what it technically captures.
A camera mounted too high sees a wider area but often can’t identify faces clearly. One mounted too low might get great facial detail but miss anything happening at eye level or above, like someone reaching for a package on a raised step.
Security researchers generally recommend doorbell cameras sit around chest to eye height for the best balance between coverage and identifiable detail, a point echoed in installation guidance from the International Association for Home Security Professionals. If yours was installed by a previous homeowner or a rushed contractor, it’s worth double-checking the height before you assume the angle alone is the problem.
A quick expert-style tip: If you can’t move the mounting height easily, try adjusting where visitors are expected to stand instead. A small doormat placed a foot closer to the camera can shift someone directly into your best-covered zone without you touching a single screw.
Layer Your Coverage Instead of Relying on One Fix
The homeowners who deal with blind spots the least don’t have the most expensive setup. They usually have layered coverage instead.
That means combining a few small, low-cost fixes rather than chasing one perfect camera. A wedge mount here, a motion light there, maybe a cheap secondary camera covering the driveway. Together, these small pieces cover far more ground than any single premium device could on its own.
If you haven’t already looked at how your smart home cameras work together as a system, this is a good time to think about coverage as a whole property, not just one front-facing lens.
Where People Quietly Sabotage Their Own Camera Setup
I want to be honest about something. A lot of blind spot problems aren’t really about the camera at all. They’re about small decisions people make without realizing the consequences.
The biggest one I see constantly is installing the camera once and never touching it again. People treat the first setup like it’s permanent, when really it should be treated more like a starting point.
Another mistake that quietly costs people real evidence: ignoring the app’s motion zone settings entirely. Leaving everything on default means your camera treats every leaf, every car headlight, and every shadow the same way it treats an actual person walking up your steps. That flood of noise makes it easy to miss the one alert that actually mattered.
Here’s one that stings a little to admit. People often assume a wider lens automatically means better coverage. It doesn’t. Wide lenses distort footage at the edges, which means the very corners you’re relying on to catch someone might be too blurry or warped to actually identify them in court or with police.
Placement mistakes are just as common, and just as costly:
- Mounting the camera directly under a roofline that creates constant shadow
- Placing it too close to a bright porch light that causes glare every single night
- Ignoring how nearby motion, like a busy street or a neighbor’s yard, triggers constant false alerts that eventually get ignored altogether
- Never testing footage quality after dark, only checking it during a bright afternoon setup
There’s also an emotional mistake people make, and it’s an easy one to fall into. Once someone installs a camera, they stop thinking about their entry points the way they used to. The camera becomes a mental substitute for actual awareness.
That’s a dangerous swap. A camera records. It doesn’t prevent anything by itself. Pairing your camera with basic habits, like reinforcing your front door or keeping outdoor lighting consistent, matters just as much as the camera itself.
If any of this sounds like your setup, please don’t feel bad about it. Almost everyone makes at least one of these mistakes early on. The point isn’t to feel guilty. It’s to fix what’s fixable and move forward with a setup that actually works.
Common Questions About Doorbell Camera Blind Spots
Why does my doorbell camera have a blind spot right below it?
This happens because most doorbell cameras are angled to see straight ahead, not downward. Anything directly beneath the unit, like your welcome mat or the bottom step, often falls outside the frame entirely.
Can a wide-angle lens fix all my blind spots?
Not completely. Wide lenses cover more ground, but the footage near the edges tends to warp and lose detail, which can make faces or license plates hard to identify later.
Do I need a professional to fix camera blind spots?
Usually not. Most fixes, like adjusting the mount angle or repositioning a light, take less than fifteen minutes and require no special tools or wiring knowledge.
Why does my camera work fine during the day but miss things at night?
Nighttime issues are almost always related to glare or infrared range, not the camera’s actual field of view. A porch light shining into the lens is the most common culprit.
How many cameras do I actually need to cover my front entry?
For most homes, one doorbell camera plus one additional camera covering a driveway or side entry closes the majority of common blind spots without overspending.
Will moving my camera higher improve my coverage?
Sometimes, but not always. Higher placement widens the view but can reduce facial detail, so it’s worth testing footage quality after any height change rather than assuming higher is automatically better.
Your Camera Can Actually Do Its Job Now
Here’s what I want you to take away from all this. A blind spot isn’t a sign that you bought the wrong camera or wasted your money.
It’s just a gap that nobody pointed out to you until now. Small, simple adjustments close most of these gaps completely, and none of them require replacing your entire setup.
I spent way too long assuming my camera saw everything it should. Once I actually tested it properly, walked my own property, and made a few small changes, I finally felt like the device was doing the job I paid it to do in the first place.
Take fifteen minutes this week and walk your own porch and driveway with your app open. You might be surprised by what you find, and even more surprised by how quickly it’s fixed.
Disclaimer: This article is for general informational purposes only and does not constitute professional security, legal, or safety advice. Camera performance can vary based on brand, model, installation, and property layout. For specific concerns about your home’s security setup, consider consulting a licensed security professional in your area.